Installation Guide
TECHNICAL DOCUMENTS
-
1. Install the XPU
Before installing XPU, make sure docker, nvidia driver & nvidia-docker are installed.
Make sure docker is installed
version greater than 19.03.
Make sure nvidia driver is installed
You can use nvidia-smi command to check if driver is installed. Or you can install the driver refer to this document.
Make sure nvidia-docker is installed
You can install nvidia-docker refer to this document.
Download the installation script from Youyou website to install the XPU. The installation script determines the version to be used based on the current Linux version. The download address is as follows:
http://www.openxpu.com/release/xpu-installer.sh
2. Use XPU
XPU divides the complete GPU into different shares for containers. We call it shares, which is a collection of computing power and video memory. When running an XPU container, you need to assign shares of different GPUs to the container through the environment variables of the container. XPU container runtime prepares corresponding GPU devices for the container according to corresponding environment variables and allocates corresponding shares. XPU shares GPU through split shares to achieve fault isolation, video memory isolation and calculation force isolation.
Example:
#>sudo docker run -itd --gpus all --runtime=nvidia --name xpu -v /mnt:/mnt -e OPENXPU_XPU_SHARES=0:4096-50% nvcr.io/nvidia/cuda:11.2.0-devel-centos7 /bin/bash
Assigns 4096MB of memory, 50% weight of GPU index 0 to the container.
You can also use GPU UUID to indicate which GPU to use: OPENXPU_XPU_SHARES=GPU-c5963e55-4cc8-359b-d2d8-b8d4ba5bd92d:4096-50%.

-
In the K8S cluster, we provide two parts the Extended Resources and the Device Plugin after K8S 1.18. The Device Plugin: K8S custom device interface, defined the action of heterogeneous resources report and allocate. The vendor should implements the api, this solution will not modify any code of kubelet. The Extended Resource(XPU extended resource is yoyoworks.com/xpu-shares),K8S scheduler allocate XPU resources to Pod based on this definition.
We will install the xpu-device-plugin and xpu-extend-scheduler plugins to use XPU in K8S cluster, as below:
1. make sure Kubernetes version >= 1.18;
2. mark the GPU node with label xpu=true:
#>sudo kubectl label node <node_name>xpu=true
as below:

3. deploy xpu-device-plugin plugin:
#>sudo kubectl apply -f http://www.yoyoworks.com/release/latest/k8s-plugin/device-plugin-rbac.yaml
#>sudo kubectl apply -f http://www.yoyoworks.com/release/latest/k8s-plugin/device-plugin-ds.yaml
4. deploy xpu-extend-scheduler plugin:
#>sudo wget http://yoyoworks.com/release/latest/k8s-plugin/scheduler-policy-config.json
Modify K8S scheduler configuration file /etc/kubernetes/manifests/kube-scheduler.yaml:
- --policy-config-file=/etc/kubernetes/scheduler-policy-config.json
- --use-legacy-policy-config=true
- mountPath: /etc/kubernetes/scheduler-policy-config.jsonname: scheduler-policy-config
readOnly: true
- hostPath:
path: /etc/kubernetes/scheduler-policy-config.json
type: FileOrCreate
name: scheduler-policy-config
apply the yaml file:
#>sudo kubectl apply -f http://www.yoyoworks.com/release/latest/k8s-plugin/xpu-scheduler-extender.yaml
5. check the status of xpu-device-plugin & xpu-extend-scheduler plugins:

6. test,write the XPU extended resource to example Pod yaml as below:
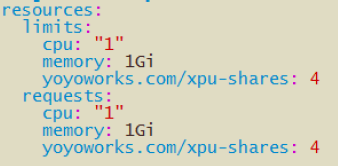
or you can download an example yaml from link below:
#>sudo kubectl apply -f http://www.yoyoworks.com/release/latest/k8s-plugin/xpu-sam.yaml

Heterogeneous GPU virtualization platform